Tuesday, April 29, 2008

You might not want to see this - its uncovered

Today I had my stitches out so my digital hand looks a mess. The surgeon warned me that it would look as if a dog had savaged it and it does. I will put the image of it up as small as it will go and it's up to you if you click on it to see it life size. As a matter of interest I used the flash on the camera as available light made it look even worse than it is. After the surgeon had told me it looked ok to him i was taken away to have the stitches removed. The nurse who removed them thought I would be having physiotherapy so left it uncovered. When I checked in to physio they gave me an appointment for tomorrow. I had to come home with it as you see it. Not a pretty sight.

Friday, April 25, 2008

More about the cutting out post


I did not explain what the head thing was about. I was commissioned to do this picture -actually a series of pictures- for a record cover. In the event it wasnt used as it was considered to be too peculiar. I think the group was the Pogues but if my client ever reads this he might put me right.
I have had a number of near misses in my career so I dont mind. I did get paid for it. The image on the right has a GMW Turner picture projected on it. This technique is quite easy to if you have all the necessary equipment - that is. This one was done on old fashioned film the images having been copied from books onto transparency film and projected using a standard 35mm projector. If you are forced to use a video projector then dont forget to use long exposure times to avoid any scan lines.

Thursday, April 24, 2008

Cutting-out


Todays episode was going to be a simple cut-out. I started with a simple shape from an old portfolio picture of mine. A change in background would work well.
I opened the picture in Adobe Photoshop and tried various ways of selecting either the background or the head but neither worked. Of course I could have gone right tound it with the lasso tool - but I find when you get to a corner the lasso generally lassoos itself through a bit you didnt want to go through. The other alternative is the pen tool to make a path that can be converted to a selection. Well- you folk out there don't learn from doing it the easy way so here is how I finally got to cut it out. The first problem I had was that the image was grainy and the edge was not very well defined. To make the edge clearer I chose to use a channel. I opened the channels folder and selected first the blue channel`nd made a copy of it. This wasn't quite right so I made a copy of the red channel - this was good enough. (Unhappily when I set photoshop up I elected to show channels in colour so this is a good reason not to as you can see straight away which channel is going to give the best contrast).
The next step is to enhance the edge of the subject (it isn't really necessary here as the edge is quite clear - but you might need to do this sometime). This takes several steps.
  1. click: Image/Adjustments/Equalise
  2. The next step is click: Filter/Other/HighPass - and choose a radius that gives the best definition

  3. Next: Image/Adjustments/Levels - to give a high contrast
  4. Next you can start erazing the background roughly, not to close and eraze it to white (ie background color white)
  5. For the next step you need to clean up to the subject - I do this at fairly high magnification to see what is happening. For the forehead I used the Lasso tool and for the nose, mouth and chin I used the Pen tool to make a path which I converted to a selection. Just click on your Delete button on your keyboard to clear a selection.
  6. When I had converted the path to a selection I addeed a layer and filled my selection with white. (When you convert a path to a selection you get the opportunity to "feather" curves which I did at 1 pixel). The next thing to do was to select the white backround I did this with the Wand tool. I realised that it was going to crop into the head so I made yet another layer and filled the background with grey (it could have any colour just that I needed to see what was going on.
  7. Finally I re-selected the layer with the mouth etc. and selecting the background inverted my selection then in the top layer with the rest of the background I erazed the area where the main background was overlapping. This was easy to do as I just rubbed out up to the selection dots. To give this result:

Monday, April 21, 2008

An addition to my panorama blog


The "Layers" panel on the right is showing a "Background copy" - I did this to give me a transparent background. If you work directly onto the original Background layer the canvas takes on the colour of the background a solid tone of black, white or whatever you choose. I prefer to be more flexible. With Background copy you can reposition it, put a border all the way round and so on. If you click on the Background in the layer box and highlight it you can add a new layer which will become the base layer. This layer can be filled with a colour ot a pattern to make a border. If you want a border dont forget to cange both the width and height measures when changing the canvas size. I prefer to work with image files at the original size (full size camera original) as retouching is more accurate. When you have finished all the steps then crop and change pixel depth at the end. If your intention is to prepare an image for the web it doesnt need to be any bigger than a normal full screen size - about 1000pixels wide. If it is going in a blog it will be displayed smaller than that anyway, only going to full size when it is clicked on.

Framed - View

Saturday, April 19, 2008

An Afterthought

My previous blog regarding Panoramas was becoming too big so I published it before I was through. I would like to emphasize that there are many ways of doing things in photoshop. It is important that you remember what works best for you. My next point is regarding subject suitability. My 3 pictures just about work together because I shot them with a panoramic view in mind. You might notice that I didn't have a tripod - I got away with that. I shouldnt have used a Polariser - you might see the join in a print but it works fine on screen. My camera is tending to vignette at it's widest angle. Wide angle lenses are notorious for being brighter in the centre of image than at the edges. This is highlighted by the special filter made for the Hassleblad SWC that is calibrated to the lens you are using. This gives perfect illumination over the entire image area. I would not suggest going that far. Photoshop can compensate for this problem if you happen to be using RAW images.

A Triptych or how to join a Panorama


I like panoramas. Sometimes a photograph cannot contain a whole view. If I can I set my camera on it's tripod and take a series of shots -mostly landscapes-and stitch them together in photoshop. There are many programs available that do this but I get nore satisfaction out of doing it myself. Today I have chosen 3 images taken in Austria last year. For a start I will put them next to each other then marry them together.


  1. My 3 Images laid in rough position


  2. I have chosen the left-hand image to be the container for the others. Click on image choose canvas, click on a square on the left side of the box with all the arrows and then input a size you want the width to be. I chose 300cm approx 3 times the size of the background image.

  3. Choosing the centre image Ctrl+A selects the whole image, Ctrl+C copies the selection then if you click in the area of the background picture with the large empty space and then click Ctrl+V - you will have pasted the 2nd (middle) image into the picture. Do the same with the 3 rd shot to end up with 3 images together. At this stage the images can end up anywhere in the scene so.


  4. Using the Vectot tool click on the middle images layer and move it to where you want and the same with the other image. You can use this technique with as few or as many images as you can fit into your computers memory. I have ended up with file sizes of over 100Mb-things can slow down an awful lot if you go for the full 360 degrees.

  5. This illustrates the Vector or Moving tool. A very useful device. If you right click on the area you want to move a menu pops up showing the layers so you just click on the layer you want then move into potition. If all you want is to have your pictures next each other you can stop there, or, if you want to go for the panorama then move the layer into its appximate postion.

  6. Ready to crop for a Triptych.

  7. The 3 subjects I have chosen for this exercise are not the easiest as the sky is darker towards the right. This was due to my using a Polarising filter.


  8. The top image (ie the middle one) has it's left side erazed with a soft brush erazor.
    You will also notice that I have needed to put in some adjustment layers to make blending easier. I used Levels in the adjustment layers as the sky was giving me problems.

    Like this.
  9. And Finally (I straightened it up a bit)

Friday, April 18, 2008

A bit more of my portfolio


I dont have thousands of images in my portfolio as you will see - as time goes on. I had to leave piles of stuff behind when the landlord of the building I was using changed the locks. This is my first record sleeve that had my name credited on it. The group are mostly famous for "Two pints of Lager and a Packet of Crisps Please". I am sure you all remember that. Cover Design by Barbara/Ian for Cream (I don't think they still operate under that name). The shoot was'nt altogether a success as Splodge (the dog) wouldn't pee into the horn. Et was all we could do to get him to stay in shot. This was long before Photoshop got going. I am not saying it wasn't around just my clients were artists and didnt hold with new-fangled technology. (Sorry Ian). The wonder was that we got anything at all. Such was the life of a Photographer in those days. As I said before - this was the first of my oics to carry my name. There are many occasions when the photographer is anonymous -some planned and some not.

My first actual album cover doesnt really count as it is only a flat-art copy. This, however, was much more tricky than the Splodge as it had to be dead straight - there being no Photoshop etc. My first was Pink Floyds "The Wall". The artwork was a full size (almost) rendition of a cartoon drawing of a wall. Of course my copy of the album doesnt quite make it straight. To get the shot we had to borrow a large studio and 10x8 camera -the lot. My little company didn't run to such luxuries. We had tried shooting outdoors but I got colour casts from the doors of the lock-up garages in the mews I worked in. Also the traffic wardens weren't very helpful as also the weather. I think the only tip I picked up from this exercise was how to make sure the camera was flat on to the artwork. If anybody needs to know this kindly drop me a line or put a comment up.

Sunday, April 13, 2008

My hand

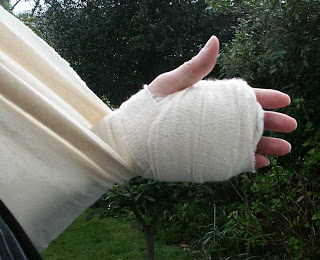
This is the current state of my left hand which will be under wraps for the next couple of weeks. I have been given 2 weeks supply of painkillers and am slightly concerned that I dont really need them. As you can see the NHS do a fine job of bandageing - they hd a bit of trouble with the sling though. They are not allowed to use safety pins so it looked a bit of a mess until I got home where we are not governed by health and safety issues. I think that I am going to start a political party whose manifesto is to disband the H&S Executive so we can all be treated as sensible human beings. The human race is known (in latin) as homo sapiens sapiens - this means wise, wise man - I don't think so.
I don't think this blog has much to do with photography, but, as I may have said before everything I write in this blog is my own opinion and is derived from years of experience.
You may like to know why my hand is bandaged up. Well it has been operated on for a condition called Dupuytrans Contractor. My fingers were curling in towards the palm as the tendons had developed a growth surrounding them. The nice people at Charing Cross H{ospital seem to have done an excellent job and my thanks go out to the team on the 7th floor that looked after me for the day. The consultant was Mr Forester and if you ever need it done I would recommend him. The dupuytrans.co.uk web-site like to make it clear to everybody that you must choose your surgeon with care as not all surgeons are up to the delicate surgery involved in working on the hand - which has more bones, tendons, nerves and blood vessels than practically any other part of the body.

Saturday, April 12, 2008

Close-up

Today's topic is the close-up, as in macro-photography. I am not going to illustrate this as it is rather technical and I want to simplify it for you. Let us say that we want photograph a small insect. If you were using a slr 35mm film camera you might want to fill as much of the image area as possible or at the very least shoot it the same size as in real life. The standard lens for a 35mm has a focal-length of 50mm (this corresponds to the diagonal measurement of the film plane). To obtain an image of 1:1 ratio ie same size you will need to use extension tubes that will add another 50mm to the distance between the effective centre of the lens and the image plane. If you achieve this you would find that point of sharpest focus is about 100mm away. The point of sharpest focus at the widest aperture is very shallow about 1 or 2 mm. To get sharp focus therefore you need to be able to rack the camera in and out with quite a lot of accuracy. It is extremely unlikely that you could use autofocus effectively as there is no point in moving the focussing ring on the camera as all it will do is make your slightly out of focus image smaller or larger as by try to focus using the cameras focus moves the lens further or nearer the image plane.
Now then, if you are trying to do this with a zoom lens you might find it difficult as the construction of a zoom lens uses negative or extra elements to change the focal length. Most lenses of this type use a telephoto design to reduce overall size. The most likely outcome is that the subject ends up so close to the front of the lens that it is impossible. As an example of this the Canon 300D was made with the reflex mirror small enough to site the lens nearer the image plane - but still it is what is called retrofocus (ie the focussing distance is greater than the effective focal length). To achieve optimum close up focussing the focal length of a lens needs to be greater than the physical body depth plus the distance to the effective centre of the lens array. Even if you can achieve real close up with a zoom or retrofocus lens the field of sharp focus will not be flat. Lens manufacurers go to a lot of trouble to make "macro" lenses. However, they are worth it as an investment. As a general rule I prefer single focal length lenses over zoom lenses as I have found them to both sharper and clearer than zoom lenses. If you are thinking of buying new lenses always read the reviews and not just from one source. Never trust a salesman to give unbiased advice. There is a lot more to be said on this subject. I will try to illustrate it next time. Any questions - please ask.